The Easy Guide to Updating Your Facebook Custom Audiences
- Metric Meteor

- May 18, 2023
- 3 min read
Updated: Aug 30, 2023
When it comes to Facebook advertising, Custom Audiences is an invaluable tool. They allow you to target ads to a specific group of people who are more likely to be interested in your products or services based on their past behavior.
But what happens when you need to update these audiences? Maybe you've got fresh data to add, or perhaps you need to change the parameters of your audience to better align with a new campaign.
In today's post, we're going to walk you through the process step-by-step. Here's how you can update your Facebook Custom Audiences.
Step 1: Start at Home
First things first, you'll need to log into your Facebook Business Manager account. Once you're in, navigate to the Audiences section in the Ads Manager dashboard. You can find this by clicking on the menu button (≡) and selecting "Audiences" under the "Assets" column.
Step 2: Choose Your Audience
Now that you're in the Audiences section, you'll see a list of all your saved audiences. Find the custom audience you want to update, and click on its name.
Step 3: Make Your Updates
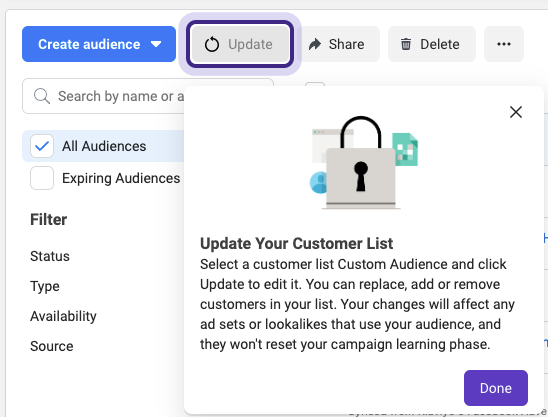
Once you've selected the audience, click on the "Edit" or "Update" button. This is where you'll make your updates.
If you're updating a Saved Audience, you can adjust elements like the audience's age range, gender, location, interests, and behaviors. Make your changes, and click "Save" when you're done.

Step 4: Replace or add customers to your manual customer list
Meta Audience's new feature empowers you to effectively manage your customer list. You now have the flexibility to either replace the entire customer list, remove specific customers, or simply add new ones. This streamlines the process of keeping your ads and audiences updated based on user interactions or requests.

Step 5: Upload a .CSV or paste comma-separated values
For optimal results, consider uploading a .CSV file consisting of your customers' email addresses. This data will be hashed and subsequently synchronized with Meta user IDs, ensuring a secure and efficient way to match your customer data with the respective user profiles on the platform.

If you're updating a Custom Audience based on a customer list, website traffic, or app activity, you'll need to update the source of your audience. For a customer list, click on "Add Customers from your own list", then upload the new file or import the data from Mailchimp. Follow the instructions, review and map the data, then click "Upload & Create". For website traffic or app activity, adjust the time window for tracking or modify the specific web pages or event criteria that define your audience.
Step 6: Confirm Your Changes
Once you've made your adjustments, click the "Update Audience" button. Facebook will then start updating your audience with the new information. Keep in mind that this can take several hours depending on the size of your audience.
A word of caution here: frequent changes to your custom audiences may cause disruptions to the delivery of your ad sets that are using these audiences, so it's generally a good idea to keep updates to a minimum unless necessary.
Stay On Top of Your Game: Guide to Updating Your Facebook Custom Audiences
Updating your Facebook Custom Audiences ensures that your ads are always reaching the right people. Regularly review and update your audiences to keep your targeting sharp and your campaigns effective. As always, test different strategies to find what works best for your business. Happy advertising!


Comments